|
| Boiling Sky, Langdon, New Hampshire |
Finding the Hidden Detail
Overcast skies have always been a challenge for photography and this is especially true in the Autumn, when the weather becomes more changeable. As I mentioned in last weeks blog article, the best approach flat dull skies has often been to crop them from the image, but with new powerful editing software it is possible to find interesting detail in those grey clouds without creating muddy foregrounds. It is time to reclaim the sky.
Cheating with the Sky
For years it had been a habit of mine to collect images of nice skies. Whether it was puffy white confections floating in a deep blue orb
or the lovely colors of a golden sunset, I would always pause during my shoots to capture a few shots of the sky with as little ground as possible. I would save these treasures in my "skies" folder to be pulled out whenever I had a picture with a lovely foreground but a flat washed out, overcast sky. Back then, the selection tools in Photoshop were not as sophisticated as now, but I would still spend
time trying to seamlessly composite one of my skies to save my image. The trick was to find a sky that seemed to match the scene's light direction and color, while muting the stark contrast between a bright sky and the softer foreground. My results were decidedly mixed and, of course, bathed with artistic dishonesty. What can I say, I've always been willing to compromise my morals in the service of the image. The picture here represents the first time in years that I have blended a different sky into an image. The effect is purposely exaggerated, but I'm still glad that I don't have to do this anymore.
 |
| Sky Archive |
 |
| Cheating on the Sky |
 |
| Black Mountain, Dummerston, Vt |
Things have changed in the last few years. Today, It is a struggle to even find my Sky Folder. The sky hasn't changed, and my moral compass hasn't shifted. The difference has to do with the improvement in image depth and quality and the remarkable advances in editing software. I can now bring out the the detail and drama that I saw in those dark and brooding skies
 |
| Winter Clouds Over Mt. Monadnock, Marlborough, NH |
Shooting in the RAW
The first key to salvaging flat skies is a properly exposed RAW image. It seems strange now that there was a time when I actually struggled over the question of whether I should switch my shooting from jpg to RAW. The enhanced image depth from an 8 bit jpg to a 14 bit RAW file means that I can work with 16,000 tonal gradations as opposed to just 256. That difference is especially powerful at the upper end of the brightness spectrum where the increased depth allows wonderful detail to be drawn out, even from apparently featureless skies. This was never possible with jpg files. (see my article about exposing to the right). Proper exposure is still important. It is critical to avoid over-exposure which can result in blown out the highlights. Here again the histogram is invaluable. A properly exposed RAW file is the essential prerequisite, providing the information necessary for the next step to a reclaim the sky and that next step comes in the software.
Software Highlight Control
There have been substantial improvements in highlight management in recent versions of photo editing software. Here I will be speaking of Photoshop and Lightroom (LR), but there may be similar tools in other programs. Essentially what the software does is to expand the tonal range in the highlights of the sky to provide more contrast without unnaturally darkening the rest of the image. Again, it is important to start with the increased tonal range found in the RAW file. There are a number of tools that can be used to reach this goal.
Shadow/Highlight
Since its introduction in Photoshop CS, one of my favorite tools in Photoshop has been the Shadow/Highlight adjuster (S/H). This is found in the adjustment section of the Image pull-down menu.. The tool almost magically allows individual adjustment of both the highlights and shadows in an image. For this discussion, I will be focusing on the highlights where the S/H tool draws out the contrast and detail in the skies. The Tonal Depth slider controls
the range of the effect restricting it to the desired areas of brightness. Shadow/Highlight is often one of my first steps in managing highlights, but it must be used carefully. Overuse can lead to unnatural appearing skies and the presence of bright halos around areas of high contrast. The halos can be controlled by adjusting the radius slider. Even with the increased tonal depth of RAW images, attempting to draw out too much contrast can lead to the appearance of posturization, with sharp steps between tones. The goal should be to adjust the sky to reveal the detail seen on site. I must point out that the S/H tool is too complex to be available on an adjustment layer and has to be applied to the actual image. To protect the background image I always work with S/H on a copy of the image layer. Alternatively, the S/H adjustments can be applied to a Smart Object Layer, allowing continuous adjustment as the editing process proceeds. The S/H tool is remarkably powerful but in recently I save these adjustments for later in my editing work-flow and do much of my "sky work" in the RAW of Lightroom.
 |
| Shadow / Highlight Adjustment |
Lightroom and Camera Raw
Newer versions of Lightroom and Photoshop’s Camera Raw have added greater flexibility in dealing with lost details in the highlights and have eliminated or reduced my need to use S/H later in my workflow. Recently I have shifted much of my RAW editing from Camera Raw to Lightroom 5. I find the work flow to be much
easier and more intuitive, but newer versions of Camera RAW have similar capabilities. In my photograph of fall color across a field in Langdon, New Hampshire, the original RAW image appears flat with washed out colors and the sky has none of the color and contrast that I remembered from the scene. This is typical for unedited RAW images, but, as can be seen in Lightroom 5, the histogram reveals good tonal range. The highlights are shifted to the right but are not blown out. The picture does not look great, but I know that my vision is hidden within the pixels, straining to be released.
 |
| Flat Raw Image / Good Histogram |
The Develop Module
In Lightroom's Develop Module, I slightly increased the exposure and then reduced the Highlights and Whites sliders to reveal the sky detail. The Shadow and Blacks sliders controled the exposure and contrast in the shadow areas. My basic approach is to use the
Whites and Shadows sliders to make the major changes. I then increase the Highlights slider to add contrast and avoid muddiness in the sky. In the same way, I decrease the Blacks slider to provide contrast and definition to the shadows. The result should be softer contrast in the mid tones while preserving the "Pop" in the highlights and shadows. These alterations could be done with careful manipulation of levels and curves in Photoshop, but they are easier and more naturally controlled in LR or Camera Raw. And all changes are reversible and nondestructive.
 |
| Lightroom 5 Development |
After my tonal adjustments I continue to work through the Develop Module. I have come to like the workflow suggested by the stack of tools in this module. I adjust vibrance and clarity. I make some preliminary tweaks to sharpness and noise, although my final sharpening is always reserved for the end of my editing, when I have the image at its desired size. The automatic Lens and Chromatic Aberration controls generally work well, but I always zoom in to the edges to to make any necessary custom adjustments.
Photoshop Tweaking
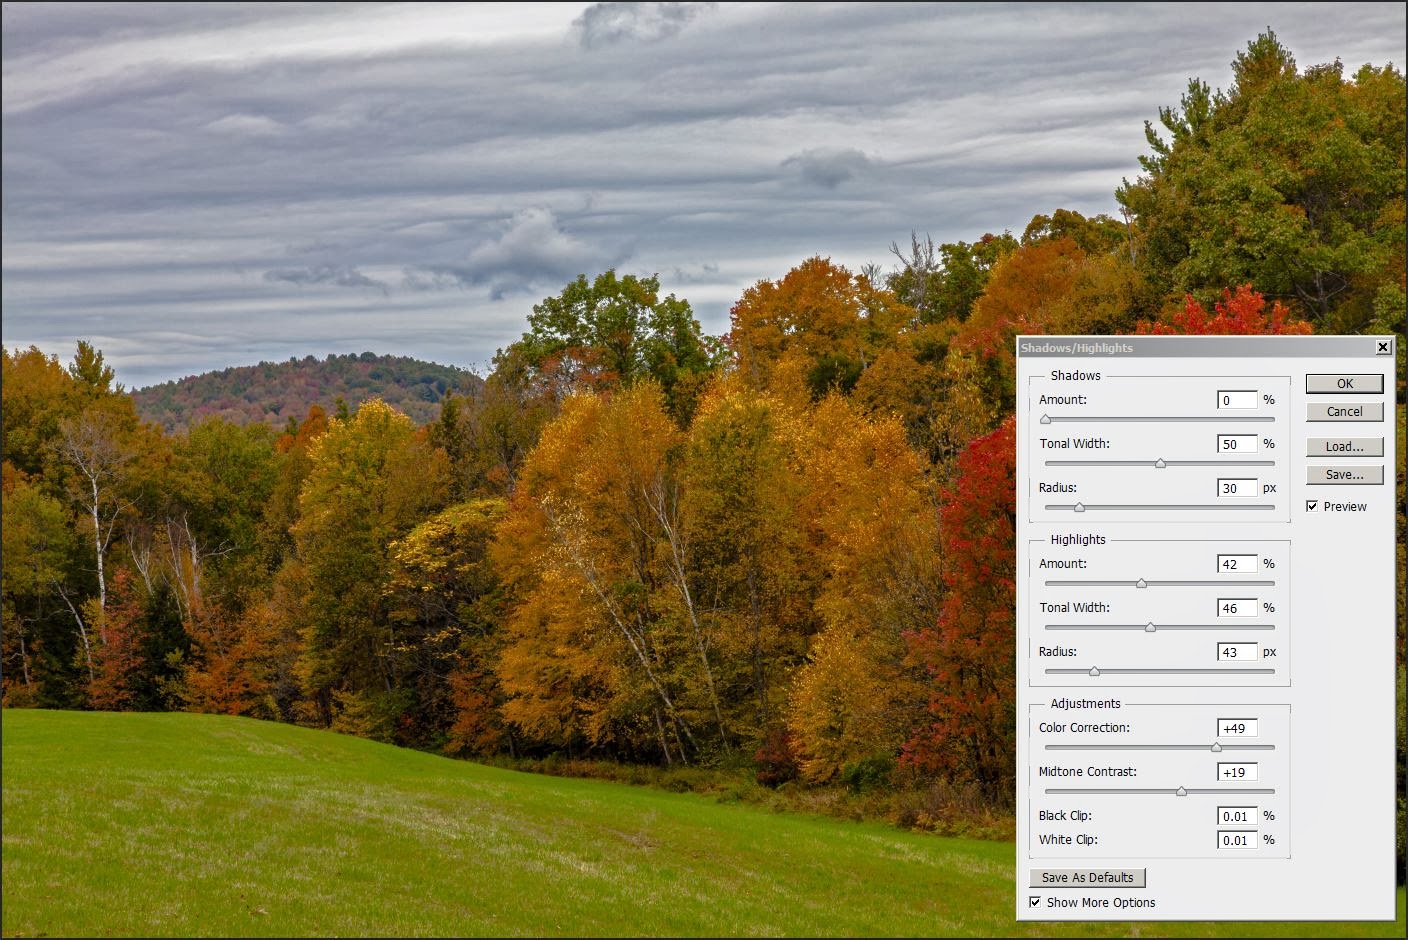 |
| Shadow/Highlight Adjustment |
By the time I move my images over to Photoshop, the skies are generally looking pretty good. I may still use the S/H tool but the
adjustments can be fairly subtle and much less likely to add artifacts and halos. In this image I took the further step of isolating the sky in a carefully drawn selection and then added further contrast with a curves layer. The end result was purposely over done for illustration, but the advantage of the selection is that I was able to invert it to apply a separate curve adjustment to the foreground. Normally I would mute the effects shown here but in every step the strength of the manipulations are strictly a matter of taste.
 |
| Selective Curve Adjustment in SKy |

That's it. The result is a image that shows the brilliant fall color against the dramatic boiling sky that was visible on that cool autumn morning. It only remains to add a couple of caveats.
First I apologize for rushing through descriptions of editing that would require books to fully describe. My purpose is only to illustrate what is possible in our amazing digital world. Full understanding and control of these tools is really an exciting, life-time journey. For those who don't have access to programs such as Lightroom and Photoshop, I can only say that amazing capabilities are within the range of most budgets. Lightroom 5 is available for only $149 - save your pennies.
 |
| Steel Sky, Chesterfield, NH |
Some will say that the same results could be obtained with a multi-image HDR. Certainly true, but for me the adjustment of the single image is easier to control, more natural, and less subject to artifacts and noise.
As always it is a matter of taste, but regardless of your approach, get out there and reclaim the sky!
Jeffrey Newcomer