Showing posts with label winter. Show all posts

Sunday, March 30, 2014

Bagging My Snowy


The Magic of the Snowy Owl
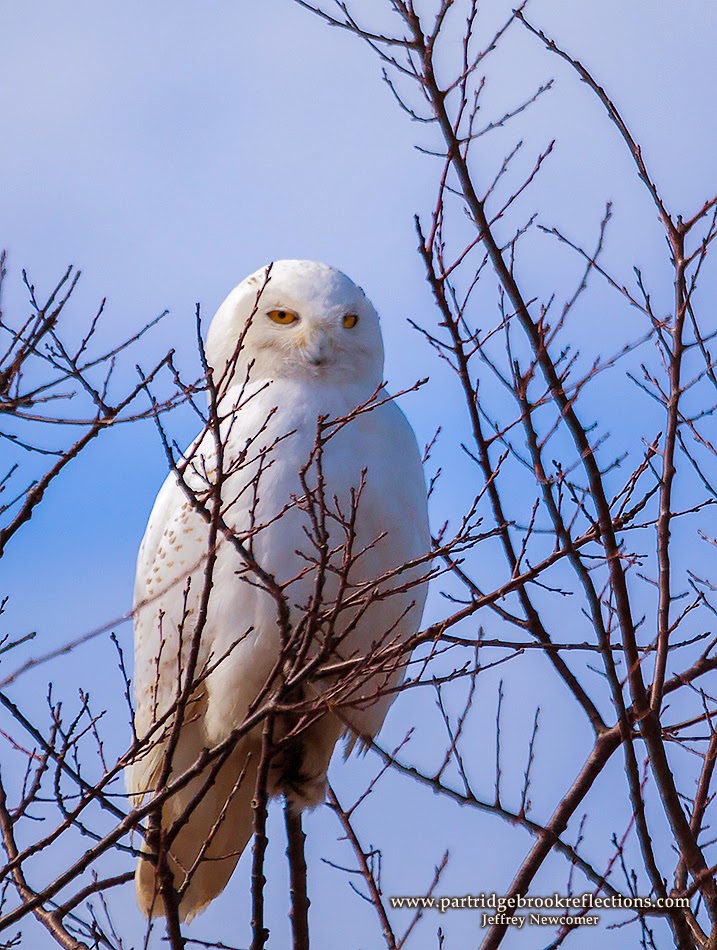
I resisted it for as long as I could. All winter I have enjoyed watching the flood of dramatic pictures on Facebook of the Snowy Owls that have invaded our New England coast in record numbers. These beautiful birds are usually a rarity this far south, but every 4-5 years there is an “irruption” as the supply of Lemmings, their staple food, rises in its normal cyclic pattern. This year the Snowies have launched a full scale invasion. It is estimated that this is the biggest irruption in the last 50 years. Facebook in general and the New England Photography Guild FB site in particular have been overflowing with fantastic images of Snowy Owls. It seemed that every other picture on the site was of an adorable white raptor fluffed up against the cold. I haven’t seen any Snowies in the Monadnock region, but it became apparent to me that I can’t call myself a New England photographer unless I have a Snowy in my portfolio. So I finally surrendered and headed to the coast last Monday to try to catch a Snowy before they made their springtime retreat to the northern tundra.

Failed Search


Two years ago I had made a similar attempt, but came up empty. I had taken the two hour trek to the New Hampshire coast on a cold February morning and searched the coast for several hours before I
Hampton Beach Sunrise
had to give up. I had to fulfill my responsibility to photograph the Cheshire Medical Center's participation in the "Penguin Plunge". The plunge is an annual fund raiser to Benefit the Special Olympics in which otherwise sane individuals pointlessly dive into the ocean at Hampton Beach. For several years I came along to record my friends in various shades of blue as they emerged from the frigid Atlantic. The Plunge was a great success and everyone survived, but I saw zero snow owls. I did get some nice images of a clear and frigid coastal sunrise.

This year I decided to improve my odds. Several of my fellow New England Photography Guild members are world class bird photographers and I sent out a general email looking for recommendations about where I would have the best chance to bag a Snowy. John Vose got back to me with two suggestions which turned out to be perfect. It helped that the birds seemed to have settled into favorite locations and were not wandering a great deal. Also Snowy Owls are easier to find since, unlike most other owls, they tend to be active during daylight hours.

Roof Top Snowy


My first location was at the State Park on the northern side of Rye Harbor. I pulled in at about 9am and a quick tour revealed no owls
Up On the Roof
in sight. A park Ranger, who was parked in the lot, told me that a female Snowy had been hanging out around the Park for several weeks, but he had not seen her for the last few days. My hopes fell, but then he mentioned that she occasionally perched on the roof of a white house on the opposite side of the road from the Park. Again I saw nothing, but then, as I scanned further up the road, I spied a white smudge on the roof of a pink house. A glance through my telephoto revealed that I had found my Snowy! I approached the house slowly and in stages. I didn't want to spook her and even a distant picture would make the trip worthwhile. I was eventually able to approach close enough to capture close-up images of this magnificent bird. It was clear that she had become used to seeing crazy photographers and John had told me that she was quite imperturbable. I was able to capture sharp images with my Canon 100-400 zoom and a 2x tele extender. Fully extended I had 800mm to work with. The extender meant that I had to focus manually and was limited to an aperture no wider that f11, but it was a bright day and careful manual focusing was necessary anyway to deal with the shallow depth of field of the long lens. Of course my position on the side of the road with a ridiculously long lens drew passersby. I initially felt sorry for those who only had a cell phone to capture the scene, but then I realized that no photograph was necessary to capture the majesty of these birds. I felt incredibly lucky. I finally had a chance to experience a Snowy. I could have returned home happy, but I had one more of John’s locations to try and I wanted to see if I could catch a bird in a more natural environment. Roof shingles were not the most dramatic backdrop for my images. 


Salisbury Beach

I headed south to Salisbury Beach and the entry road turned out to be a bonanza of Snowies. I saw at least 3 different owls, including one in a tree, another in the grass of an adjacent marsh and one that seemed attached to a telephone pole just outside the park entrance. On weekends this road tends to be packed with cars, but on his cool Monday morning I shared the owls with only a few birders. I have read that the males tend to be mostly white while he females have more dark spots. The owls were easy to find. All I needed to do was notice where the other photographers were pointing their cameras. It was all too easy and, given how hard I worked last time, I felt a bit guilty. The one thing that I missed was good pictures of the birds in flight. They mostly seemed comfortable on their perches. I kept my camera trained on the birds, leaving room to the side toward which I expected them to take flight. Invariably I was glancing away at the moment they took wing and only caught one just as it was flying out of the frame.

Taking Flight


How can I complain? The 4 hours of driving to and from the coast was well worth the effort. I not only bagged my Snowy, but I got to see these magnificent birds in a variety of locales and activities. I now feel that I can hold my head up among my fellow New England photographers and settle back into my usual role of shooting trees, rocks and streams. 


Passing Seagull


Sunday, February 16, 2014

Photographing a Winter Sunset


Chasing the Last Cold Light
As we in New England have been struggling through this year’s bone chilling winter, it is nice to recognize the first tentative promise of the coming spring, the days are getting longer.  In the depths of winter, I typically go to work and return home in the dark.  Even with the sparkling crisp winter days and the warm glow of our wood stove at night,  it is hard to escape at least a touch of Seasonal Affective Disorder depression.  But then, usually sometime in February, it suddenly hits me.  I’m heading home and there is still light in the sky.  It may be 10 below, but that sudden revelation fills me with an invigorating sense of hope.


Spring is Coming


Steeple Light, Westmoreland, NH
It was earlier this week that the revelation struck.  I was heading
from Keene, New Hampshire to my home in Spofford and I suddenly became aware of the beautiful evening light playing against the snow.  Actual warm sunlight!  I called Susan to warn that I might be a little late for supper, and then the only question was where should I go to chase the light.  I decided to head north.


I headed north from Westmoreland to Walpole New Hampshire generally along Route 63.  The images here where all (except one) captured as
Westmoreland to Walpole
the sun dropped below the horizon, over a period of about forty minutes, covering just eight miles, last Tuesday evening. Winter sunsets have a different quality than those during the warmer months.  Perhaps it has something to do with the clearer air or ice crystals diffusing the light as then float weightless in the sky.  I suspect that the glow from the snow cover affects the drama above, but the winter white certainly helps to strengthen the appearance of the foreground as it reflects the colors from above.

On this evening my first question was whether to find a dramatic spot and sit still as the light changed or to keep moving looking for various locations that might work with the evolving glow.  I decided to hit the road.  It is amazing how quickly the mood changes as the sun dips toward and then below the horizon.  Moment to moment the light provided different opportunities and challenges.  It helped that I knew this route extremely well and could anticipate how the illumination would compliment the lovely rural countryside.

 Gizmo's World

My first stop was at a favorite farm in Westmoreland on the Old Westmoreland Road just outside of Spofford.  Of course, if you
Gizmo's World
were going from Westmoreland to Spofford, you would call it the “Old Spofford Road”.  The sun was still above the horizon casting a warm glow on the snow in the pasture.  Gizmo, the farm’s prize bull, was warming himself in the evening light.  Yes the bull’s name is Gizmo, and I’m sure he finds that name endlessly annoying.  Regardless, he is a powerfully proud animal who seemed quite content to pose for the shivering photographer.


Park Hill Light

Park Hill Meeting House, Not at Sunset
My next goal was to reach Westmoreland’s Park Hill before the warm light faded from the buildings.  Park Hill is a lovely collection of classic houses arranged around one of the most beautiful white churches in New England.  It is just west of Westmoreland’s main village, but it is really a place unto itself.  The church, which stands on a small hill above village, has been the subject of many of my photographs, but on this evening the direct sunlight was fading fast and was best seen complimenting the red bricks of a house at the edge of the green.  The glow quickly slipped away, but while it lasted it seemed warm enough to cut with a knife.  And then it was gone, but I kept moving to enjoy the afterglow of the developing “Blue Hour”.

The Blue Hour
 The Blue Hour is the 45 - 60 minutes after sunset when the sky retains a cool blue tone before all descends to black.  I found a spot
on a hill that allowed me to contrast the deep blue with the sunset reds and gold reflected off the clouds on the horizon. I especially liked the detail of the farm house and the tangle of tree branches that dominated shadowy foreground.  Just a few minutes later, and from the same location, the sunset glow could only be seen in the reflections off the windows across the cow pasture.


Orchard's Last Light

In order to get one last shot at the fleeing light, I went to the hilltop
Alyson's Orchard, Walpole, NH
of Alyson's Orchard in Walpole.  From this high vantage point, there was just enough light in the sky to illuminate the ranks of apple trees.  It was interesting to see how the chaotically pruned branches contrasted with the careful linear order of the orchard rows.  The hill was lovely, clear and cold, but the light was nearly gone and I was ready for the warmth of our wood stove heated kitchen.  Of course I was also excited to see what magic I had captured on my innocent appearing CF card.


People often say that photography is about the light, almost as if "the light" was one thing.  Of course, we all know that light is always changing and that is what makes photography so endlessly fascinating.  The surprising variety of colors and moods in the sky over the short duration of a winter sunset is a magnificent example of this restless of quality of light and it is a privilege to be able catch even a small taste of that wonder.  And yes, I have seen the light, and can assure that spring IS coming.


Jeffrey Newcomer
Partridgebrookreflections.com

Sunday, January 12, 2014

Photographing Falling Snow


And Getting Rid of the Blotches

It is a wonderful, but also occasionally painful fact that landscape photography is often at its best when the weather is at its worse.  This is certainly true when it comes to shooting the winter storms.  Whether gently settling or blown by ferocious winter gales, falling snow drops a lovely veil on any winter scene, but capturing the storm imposes a whole new set of opportunities and challenges.  These include both the practical difficulties of managing the cold and wet, and  also dealing with the fact that snow can appear completely differently depending on setting that are chosen in camera.

Practical Problems
 
The physical problems include keeping the camera, warm and dry and avoiding or removing the snow flakes that are inevitably attracted to the lens.  Simple preventive measures such as the use of a lens hood and avoiding aiming the camera directly into the flying snow can be very helpful, but in heavy snow I typically shroud my camera under a towel and only uncover the lens and viewfinder when I am ready to shoot.   Despite the best efforts, snow can attach to the lens.  It is important to check regularly and have dry lens cloths available to clear the view.  I have had the experience of taking a long series of images, only to discover that my lens had become blotched somewhere in the middle of the shoot. 

Basic Settings
Shooting falling snow requires a number of decisions about how you want the flakes to be portrayed.  Subtle differences in shutter, aperture and focal length can make a striking difference in the appearance and mood of the image. 

Shutter
Simply stated, long exposures, usually less that 1/100, will show

Central Square Storm 2 Seconds
the snow as streaks, while a quick shutter will catch the snow as individual flakes.  As longer exposures are used there is a point where the individual flakes disappear and what is left is a soft fog which intensifies with greater distance from the lens.  I saw this nicely displayed in my 2-3 second
exposures of the Christmas lights on Keene's Central Square.  The snow was coming down heavily but no falling flakes could be seen.  Of course the correct shutter will depend on how quickly the flakes are falling. often subtle differences in shutter can make a significant difference in the mood of the image.  Check out the tractor and barn comparison below.   Experimentation is always necessary. 


In the Storm, 1/90th

In the Storm, 1/250th


F13, 1/90th
Aperture
A small aperture, with a large depth of field, will include a greater depth of sharp flakes, which will tend to make the storm appear more intense.  A wide aperture will focus attention on a smaller, more intimate selection of flakes and the shallow depth of field can allow the snow to stand out better against the background's soft Bokeh. 


f20, 1/100th


1/250, 340mm
Focal Length
The foreshortening effects of telephoto lens' tend to compress deeper selections of snow again giving a more intense feel.  Wide angle lens' give a broader sense of the surrounding but may need heavier snow to capture the full power of the storm. 


Enhance Storm Intensity:Long Shutter, Small Aperture & Long Lens
1/6 th, f 16, 105mm


Crank the ISO
Of course in tough weather conditions compromises need to be
made. As always, the appropriate setting for each of these parameters is affected by the others.  In the dark of a storm there may not be enough light to combine a fast shutter with a small aperture.  Fortunately we now have the option to crank up the ISO.  Higher  ISO levels invariably result in more noise, but the good news is that there may be very few situations in which high ISO noise is less noticeable than in a blizzard.


Flash
Snow flake will stand out better, especially at night, if they are
Stone Bridge, Flash with Blotches
illuminated by a focused light source, such as a street light or car headlights, but here is probably no better way to stop falling snow dead in its track than to use flash.  Regardless of the  shutter speed the short duration of an electronic flash will freeze any nearby motion.  This effect will dissipate by the inverse square law as distance from the flash increases.  The problem with flash is that it most prominently lights the nearest flake, which are inevitably large and distracting.  With removal of the grotesque blotches (see below) the remaining flakes are more naturally highlighted  The combination of flash and natural light leads to a complex mixture of exposure and color temperature.  Again experimentation is in order.


Large Blotches Removed (See Below)


Ok, that is some of the basics.  Now let me finish with one of my pet peeves about falling snow images.  The Blotch.


Curing the Blotches
Blotched Storm
 

 For me "blotches" are the bane of my falling snow images.  You have undoubtedly seen beautiful atmospheric images of snow storms, but here and there are big blotches of white that seem out of place.  These white smudges come from the snow flakes that are close to the lens when the image is captured.  They are invariably out of focus and to me at least, extremely annoying.  Happily there are. number of ways to eliminate the blotch. 

Shade the Lens

 The simplest solution is to shade the lens from nearby flakes.  In the tractor by the barn comparison,  I shot from under a porch roof at Roads End Farm.  Magically, no blotches.  When a roof is not at hand an umbrella or a piece of card board can also help.  Just keep your shade out of the frame.


Central Square, 1/50th
Slow Shutter
The blotches are generally most noticeable at faster shutter speeds. With longer exposures the flakes are streaked and the smudged nearby flakes become less defined. Again the appropriate shutter will be dictated by the speed of snow fall and the size of the flakes.


Cloning and  Healing Brush
You knew we would have to get to Photoshop eventually.  Given the random complexity of the snow images, it is comparatively easy to use Cloning or the Healing Brush to replace the blotches.  In newer versions of Photoshop, the Content Aware Fill tool can also correct the scars. The automatic techniques, such as the Healing Brush usually do an amazing job, but occasionally I will use cloning to find a good source that matches the original background.


Multiple Image Layers 
My favorite approach to the blotch is to use multiple images.  Since the location of the blotches vary from image to image, I can use one image to patch another.  I pick the best of a series of images and then add the second best in a layer above the first.  After aligning the two images, I mask out the top layer.  I then scan the image and wherever a blotch appears I simply paint with white on the upper layer mask.  This nearly always brings up a section without the blotch. To me this is the most elegant solution, since the uncovered background tends to match that of the lower image. The blotches on the Stone Bridge above were cleaned with this technique.

The great thing about falling snow is that it provides a treasure chest of creative opportunities all within the easy reach to your camera's basic settings.  Now if we can get some snow out of this miserably cold weather, we will be set to go.  Get out there and experiment.

Sunday, December 22, 2013

Getting the Most from Christmas Lights Photography


Finding the Holiday “Sweet Spot”

This is the time of year when every good photographer turns their camera toward the lights that warm our holiday season. This week I completed an article for the New England Photography Guild on shooting Christmas lights. The blog includes a number of tips that I think are especially important when trying to capture the magic of Christmas illuminations. Check it out.  Christmas Lights Photography (to be published 12/23/13)


As always my companion “Getting it Right in the Digital Camera” blog will include some the images that didn’t fit in the NEPG article.


 I have never been a great fan of Christmas light photography; 
Lovely Understated Lighting
perhaps because of the tendency of some folks to bury their homes with garish displays that speak more of their egos than the peace and warmth of the holidays. This year I have been giving the lights another chance, looking for more understated beauty and iconic settings, and of course that led me repeatedly to the beautiful and icon Central Square in Keene, New Hampshire. 


I have taken hundreds of pictures of Central Square, but the most popular have been those taken during winter with the Christmas decorations and lights. The square has 4 key elements that can be mixed and match in a wide variety of compositions. These include the gazebo, the white church and, during the holidays, the Christmas tree. Oh yes, and the fourth element is the traffic, both human and vehicular, that always has to be accounted for. This year our tree is a bit small, but nicely decorated. I came back to the square 5 times looking for the best combination of light and atmosphere. I think I finally hit on the “sweet spot” earlier this week.


Bare Ground & Dark Skies

 When I started visiting the Square the lights were beautiful, but the ground was bare. I experimented with compositions including all of the elements, the church, the Gazebo and the tree, but later tried other combinations. The first problem was that the brown grass was unattractively barren and did nothing to reflect the lights. I tried to arrange compositions to include as little of the ground as possible, but I needed snow, and that came last weekend.


As soon as the snow had stopped, I was out again, shooting some of my favorite angles around the square. The key to snow photography is to catch it when it is fresh, the "winter wonderland" time when the trees and buildings are still frosted. This is especially true for Christmas lighting. As I discussed in this week's NEPG Blog, the snow on the trees reflects the color of the light best when the snow is close to the bulbs and before the heat of the lamps melts it away. 


The Blue Hour, but No Snow
One of the keys to Christmas light photography is to shoot during the “Blue Hour”, that time just before sunrise or after sunset when the sky retains a lovely blue glow, but does not obscure the illumination. Lighting photographed in the full darkness tends to appear as if floating in space without sense of context with the underlying scaffolding and surrounding, unilluminated structures.

So what is the sweet spot for Christmas lights photography? For me it includes all the important elements; an iconic New England scene, beautiful and not garish lights that complement the locale, cool twilight in the sky and fluffy fresh snow. After last weeks snow, I hit the jack-pot on central square with all of these elements, but there was on thing

missing. 


It was the classic white church at the top of the square. The United Church of Christ was an essential part of many of my compositions, but the flood light which illuminate the facade didn't come on until the darkness had nearly fully descended. I was

missing the "Blue "Hour"! There 
The Sweet Spot
was some reflected light from the gazebo, but even with enhancements in post, it didn't have a natural feel. There was only one thing to do. I called the church and asked them, for one night, to turn the lights on a couple hours early. Everyone was very nice and understanding and after a search for the appropriate people in charge of the switch, the light came on at 2 PM last Tuesday afternoon. The evening featured a snowstorm, but I was able to catch the fully illuminated church, somewhat softened by the falling snow, and the storm provided a fresh frosting on the trees. With the long exposures the snow flakes were not individually visible, but they acted to soften the overall scene, especially with more distant elements, such as the church. As always, it was a hassle photographing in the storm, but I kept my towel over the camera and managed to keep the lens clear. Most importantly, I had my "sweet spot".

Check out my more detailed list of tips on the New England Photography Blog, and get out to enjoy the show before it flies off to the North Pole for another year.

Jeffrey Newcomer
Partridgebrookreflections.com

Sunday, March 31, 2013

Photoshop's Many Disappearing Acts


Finding the Best Way to Skin the Cat : Is there a Bad Way?

Photoshop usually provides more than one way to solve a problem. The fun is to find the easiest and most effective technique, but the newest and flashiest approach is not always the best.

My photography lives and dies with Photoshop. All my pictures pass through the program as they progresses from a flat RAW image to a picture which reflects the brilliance and drama of the scene. Photoshop is a miraculous program and every few years, when the next version arrives, it gets even better . Whenever a new version is announced the debate begins about whether the improvements are worth the expense of the upgrade, but, given the hours that I spend using the program, it always make sense to use the latest version.

What's in an Upgrade?
Over the years, most upgrades have touted a number flashy new features. Not surprisingly, Adobe aggressively markets the flash, anything that looks cool in a two minutes on-line tutorial. In recent years new features have included HDR, Content Aware Fill, Content Aware Move and Puppet Warp. These are all neat tools but have limited usefulness and they never seem to work as well as they appear in the tutorials. For me the real improvements are often much more subtle, and with greater impact on my day to day work flow. Important, recently added, enhancements have included significant improvements to the selection tools, vibrancy control, Shadow and Highlight controls, the magic Auto-Align and Auto-blend tools, and improved cloning tools. These and other practical improvement have made my photo editing much easier, quicker and more precise.

Don't get me wrong, I am an avid geek and I am always looking for excuses to play with the flashy stuff. I occasionally use Content Aware Fill, to help in the process of cleaning up my images, but it is seldom that I a find situation that calls for some of the other more specialized tools. One of the great things about Photoshop is that there is generally more than one way to solve any particular problem. The trick is to find the one that is the simplest and most effective. Sadly, simplest and most effective are seldom the same approach.

An Unnecessary Example (Moving the Branch)
Recently I caught an image of my village of Spofford, New

Snowy Village and Branch
Hampshire shrouded in fresh white just after a storm. This has become one of my favorite locations, not the least because I can literally see it from my home office window. It is easy to catch the scene in all sorts of light. The view only works when the leaves are down, but I enjoy the effect of seeing the village through a screen of bare trees. It adds to the soft and dreamy feel of the images, but I have always struggle with the one large branch that slashes across the church steeple. Because of an intruding house to the left of my position there is no way to "move" the branch by changing my location. I now feel that the branch does not substantially detract from the stately presence of the church, and adds a natural sense of a village nestled in the woods, but I keep wondering how it would look with the distraction removed. Even more significantly I was intrigued with the challenge of finding the best way to remove this prominent and intertwined feature. I have grown to like the branch right where it is, but I still decided to experiment with different techniques to remove it, including pulling out some of the “flash” of Photoshop CS6.

Skinning the Cat

Cloning 

My first approach was to try simple cloning, trying to pull 


Steeple Cloning
detail  from the surroundings to over-paint the branch. What makes the branch so challenging is that it is quite large and obscures a significant portion of the steeple structure. Cloning is relatively simple where the obstruction lies against a largely random pattern, such as the trees, but it becomes much more difficult against the rigid architectural background. Cloning can be a finicky and time-consuming task. Pieces of uncontaminated background need to found to copy over the problem areas. The final result is the complete removal of the branch. With care, patience and time, cloning can do an effective job. It took about 30 minutes to get a clean repair of this complicated image.  Much of the time was spent finding material to clone over the steeple structure.  It would be nice to find a way to simplify that portion of the repair.


Branch Cloned

Patch a Clean Steeple

Move to the left
For a second approach, I decided move to the left just far enough to move the branch off the steeple. The house gets in the way of a good, full image, but I selected and pasted the steeple as a separate layer to the original image and then moved it to overlie the difficult to clone structure. The rest of the branch still needed to be cloned but, again this was not a great challenge. Both of these first two approaches remove the branch entirely from the scene, but there is a way to rotate it out of the way while keeping it as a element framing the steeple. Enter the flash.


Steeple Patched
Steeple Patch


Puppet Warping
My final technique used one of the flashiest of the new features 


Web Around Branch
found in the last couple of versions of Photoshop (CS5 & CS6), Puppet Warping.  Puppet Warp allows selected portions of an image to be rotated around defined pivot points. It is often used to adjust the position of a model's arm or leg, sometimes with a rather grotesque effect. This approach is not perfect and still requires some careful cloning, but, in this case, it had the advantage of moving the branch rather than eliminating it all together. I started by selecting most of the branch and then chose the Puppet Warp Tool from the Edit menu. The tool creates a mesh over the selection that works as a framework that can be rotated around pivot points


Branched Moved
placed anywhere in the mesh. In this situation, I placed a pivot point where the branch met the tree and was then able to rotate the branch away from the steeple placing it in a location that nicely framed the spire. The hole left in the image was filled by a combination of Content Aware Fill and cloning, although using the steeple patch from the previous method would have been easier.  This is not the easiest approach but it saved the branch from extinction and, for a tree hugger like me, that is always a big advantage.
Context Aware Fill


Cleaned up with Cloning


This was all great fun, but after it all, I still think I like the picture with the branch untouched. I did this manipulation on a different image than the one that I captured in the midst of a snow storm, but I think I will leave the original picture unchanged. I apologize for rushing through these techniques. There are great tutorials all over the internet that discuss them in exhaustive detail. The point here was to show that Photoshop provides different way to reach the same goal. It is part of the power and fun of this remarkably pliable program. 

Branched Moved


Nice Puppet Warp Tutorial


Jeff Newcomer
partridgebrookreflections.com