Tuesday, September 20, 2011

Prague to Budapest

Prague Castle

Over the years Susan and I have generally travelled on our own, shunning large groups. We have valued the ability to plan our own schedule, avoiding large groups. We are currently on a 17 day trip to central Europe and this time we are with an organized tour. We were attracted by the chance to spend 8 days cruising down the Danube between Linz Austria and Budapest Hungary, with an extended stay in the remarkably beautiful city of Prague before embarking. Group travel has some clear advantages, including the ease of negotiating the local language and culture with knowledgeable guides. The scheduled side trips allow efficient use of time, and perhaps most importantly, group trips provide the opportunity to meet and travel with some fascinating people from throughout the US and beyond.

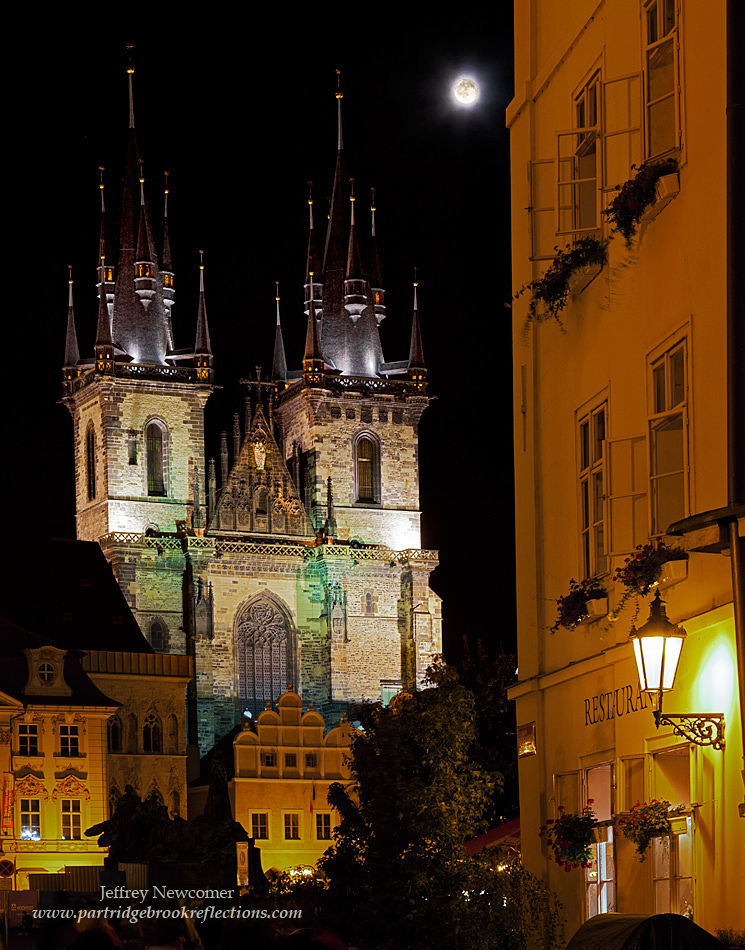


Our Lady Before Tyn Church

Group travel does impose substantial challenges to photography. First the fixed schedules make it difficult to find the best light in any location. Typically tours are scheduled for the middle of the day with stark light, which always seems to be shining into your eyes. Tours tend to move rather quickly making it difficult to spend the time needed to find and capture the best angles and lighting. Too often I have found myself looking up from my camera wondering in which direction my group has disappeared. I always try to find views without gaggles of tourists blocking the scenery. Unfortunately with group tours, we bring our own gaggle whereever we go


Vltava River Sunset
Prague, Czech Republic


St Vitus Cathedral
Prague

Charles Bridge
 The most important rule I have found to help me deal with these frustrations is to accept the fact that this is not primarily a photography trip. I try to get the best images that are possible, but sanity requires the realization that I can't always control every factor affecting my pictures. When with a group it is often helpful to either stay in front of the gaggle or lag behind. Patience is also key while waiting for that split second when people finally wander away from my perfect composition. I try to anticipate shooting conditions so that I don't spend valuable time switching filters or lens as the group speeds away.It is better not to find yourself in the dark cathedral with your polarizer still stuck to your lens. Poor light is hardest to manage. Sometimes I just have to except that I am not going to capture that golden light or the dramatic misty image and will have to settle for the best bright "postcard shot" I can construct. Since we were in Prague for five days, I considered our group tours as scouting expeditions with plans to come back on free time to look for the best conditions. In particular the evening light is wonderful as it winds it way through the narrow streets of the old city.

All my complaining aside, Prague is a spectacularly photogenic place. The classic buildings which dominate the older sections are marvelously well preserved. This is due in large part to the fact that Prague survived the second world war without extensive damage. Highlights include Prague Castle, including the massive Saint Vitus Cathedral, which looms over the old city. The old city square features a medieval clock tower and the fairy-tale Our lady Before Tyn Church. There are great vistas all along the Vltava River. The classic architecture is everywhere.


Silver Tomb
St Vitus cathedral
The schedule on this trip is non-stop. It is all I can do to find time to download and back-up my images. So by the time I have finished this blog we have already started our cruise down the Danube. Salzburg was cold, foggy and rainy, but at least the inside of the Cathedral was dry. Coming up on the itinerary is Vienna, and Budapest. I will be working on these pictures for ages after I get home, and of course we will be returning to New Hampshire just in time for leaf season.


Enough. I have some eating and drinking to do. At this point I will shut up and let the picture speak.

Friday, September 9, 2011

Packing for the Danube


This weekend Sue and I are heading off to Prague, Czech Republic to begin a 17 day trip featuring a boat trip down the Danube ending in Budapest. We will be visiting Linz, Vienna and Salzburg among with other middle European locations.  We are excited to explore a new region, but Nelly is getting a bit nervous about all the luggage.  As we approach the trip I am immersed in my usual camera gear anxiety. What cameras and lens should I take? How much do I really want to lug around? How much weight can I get on the plane. How will I handle image back-up. How will I keep my gear secure? I typically start by listing the "must brings" and then agonize over all the optionals, knowing always that the one thing I leave behind will be the one thing that I will desperately wish I had. It is always my strong inclination to bring EVERYTHING.

 
----------------------------------------------------
MUST BRINGS:

Canon 5D MII with my workhorse 24-105 f4 l lens

A ton of CF cards (I bought two new 32 gig cards for the trip)

Canon G11 (nice small, full featured, carry around camera as a backup and to use in situation in which I don’t want to display my big DSLR). I have decided not to bring my old 5D as a backup DSLR.

Laptop

Small 500 GB external drive ( have the Western Digital passport). My back-up strategy is to keep copies of images on the laptop and the HD as well as on the cards.

Various small, but necessary accessories : cable release, polarizing filters, lens cloths, batteries and chargers, power adapter, mini bunges (always), lens brush, plastic bag rain cover, and my Giotto air blower. Despite all my efforts, I will undoubtedly forget at least one critically indispensable cable and will spend half a day becoming familiar with the camera stores of Prague.

---------------------------------------------------
OPTIONALS:

Lens are always an issue. My Canon 16-35 f2.8 seemed a no-brainer. I expect to be photographing inside lots of churches and castles, not to mention capturing grand overlooks. A wide angle lens is essential. My major questions was about bringing my beast, the Canon 100-400 f4." I would love to have it , but it weighs 3 lbs. and, since Susan refuses to be a Sherpa, I can't see myself lugging this monster all over the continent. This is supposed to be a vacation after all. But then I remembered my old Quantaray 70-300.  This is the lens that I dropped into a brook a couple of years ago. It never stopped
 working, but had a bit of haze on some of the internal elements. Just enough to justify getting the Canon 100-400. When I pulled the lens out, I discovered that the haze had largely disappeared. This lens can't be compared to Canon L glass, but it is MUCH smaller and lighter (1 lb.). I will miss the image stabilization, but It is better than nothing, and the sharpness is not bad. It will be nice to have more reach without a lot more lug. So, three lens.

I toyed with not bringing my tripod. I don't expect to carry it around for most of our walking tours, and, although my carbon fiber Gitzo is not terribly heavy, by the time I add the Kirk ball head, it does add some significant weight and bulk. Then I thought about the wonderful low light opportunities, the lights at night and the chance to try HDR on the classic old world architecture. I'm bringing the tripod.

I still haven't decided about bringing a Speedlite and I may decide only when we do our final weight assessment. A compromise might be to take my lighter 430EX instead of the 580EX II. I doubt I will need the extra power and I will not be triggering any slaves.


Well of course, with all this stuff, I had to get a new bag. Photographers can never have too many bags, but seriously all mine seem either too small to carry what I would need on tours or are too bulky. I don't want to be knocking over precious shrines throughout Europe. I finally found a nice compromise National Geographic shoulder bag which I hope will work well.
  It has reasonable padding, a comfortable strap and is compressible for packing. I can fit my 5D and two lens in quite easly with room other necessaries and with reasonably easy access.  I must confess that carrying a "National Geographic" bag seems a bit cheezy to me, but the thing has a nice feel and does what I need it to do.  I may look for a patch to cover-up the logo.

That's about it. We haven't done the final weighing, so things may change. We are excited about the trip and I will try to post when I can along the way.

Sunday, September 4, 2011

Art in the Park : Show the Work!

So I have a tent and a couple display racks, but that does not make me a summer art fair professional. I say this as I am sitting in my Easy-Up 10 x 10 toward the end of the first day of this weekend's "Art in the Park" show in Keene New Hampshire. It is hot and humid, but as long as it isn't raining, I am not allowed to complain. This is the third year that I have done the Keene event. This year there were over 80 artists displaying their work during the two day event.  It is a hassle to haul all the work to the Ashuelot River Park along with the tent, tables, display racks, chairs and a cooler full of empty calories to keep me functioning. If you have not done one of these shows,


I want Mike's tall chair
it is difficult to appreciate how exhausting it can be to spend a day meeting and greeting, but I have met many people here who thrive on these shows. They spend most summer weekends traveling from town to town like artistic migrant workers. I assume that they are much more social than I can ever expect to be. I enjoy meeting people especially when they express appreciation for my work, but there are many other lovely thing to do in the summer. 


Why do I do it?  First this particular show is a community affair sponsored by my Monadnock Area Artist Association and filled with wonderful local artists. It is a great chance to catch up with friends and to meet visitors from throughout the region. Of course it is pleasant to have folks tell me how wonderful my "paintings" are, even though this typically occurs just before they move on to the next tent. I generally sell enough work to make it financially viable, but the primary reason for doing this comes down to the most important marketing technique that I have applied ever since I began trying to establish myself as a regional landscape photographer, SHOW THE WORK. I believe that for a new photographer there is nothing more important than to show your work as often as possible and in every available venue. Of course I have worked to get my work accepted at a number of regional art stores, but in the course of the last 4 years I have also participated in about 15 group shows and over 30 solo exhibitions. I have displayed my work in town halls, civic centers, churches, stores, banks, hospital hallways, and almost every restaurant in the region that happens to have a wall. Sometimes these shows have resulted in sales, but the primary goal is to show the work. I also try to keep my web presence up to date and fresh on my personal site as well as on Flickr and more recently 500 pixels. I have collected a surprising amount of private and commercial business from people who found my work as a result of a simple Google search.  Over the last few years my New England Reflections Calendar has raised over $40 thousand dollars for the Pulmonary Rehabilitation Program at the Cheshire Medical Center, but it has also been an effective tool for making my images of the region more generally know. What could be better than displaying a fresh example of my work on a monthly basis to hundreds of local families?  Increasingly I have been receiving requests for donations of images for inclusion in local charity auctions. These opportunities are valuable on a number of levels. Most importantly it is wonderful to feel that my work can, in a small way, assist in fulfilling the needs and aspirations of my community at a time when support is required more than ever. Of secondary importance is that charity auctions introduce my work to groups of people who might not frequent exhibitions or art stores. I find it remarkable that so many artists view charitable donations as a opportunity to unload unpopular pieces that have been languishing in the old photo bin. The value of your donation to your business is, once again, the opportunity to SHOW THE WORK. It costs me the same to produce an average image as it does for one of my "hero" shots. By only giving my best work both the charity and my business get the most from the donation.


Shows like Art in the Park are just another opportunity to show the work. Sure I sold some pieces and collected some orders, but the real value was that hundreds of local people got to see my photographs. In the future when they are trying to think of a birthday gift for gramma or a going away present for a co-worker, and they want something that reflects the essence of our region, they may just remember me. 

How many times did I say "show the work"? Not enough.

More about the Monadnock Area Artists Association

Monday, August 29, 2011

Surviving the Wet


With hurricane (now tropical storm) Irene drenching my corner of New Hampshire, it seems an appropriate time to discuss approaches to photography in the rain. We all love getting out to shoot in bad weather, the more miserable the better, but rain water has a way of finding it's way into lens and the sensitive electronics of our high tech cameras potentially causing disastrous damage. Recently a new friend took her Canon 5D Mark II out unprotected to shoot a spectacular waterfall that was full with recent rain. Tragically the sky opened up once again and the water transformed her marvelous camera into an inert black plastic brick. It will cost over $700 to get it working again. Although I have never lost a camera, I have had my own rain related "learning experiences". So here are few tips I have learned from my own bitter experiences and some that I have acquired from others.


Get out there
First and most importantly do go out in the rain. Wet misty days can provide wonderful opportunities to capture marvelously evocative and moody images. Instead of staying home whining on Twitter about the terrible conditions, focus on finding ways to shot without major risk to your equipment.


Dressing your camera, many choices.
There are many ways to protect your camera from the elements. An obvious answer is to to shoot from under cover. A porch or car window can work well especially if you are not shooting into the wind. Umbrellas can be tricky to manage unless you have a dedicated assistant and the wind is fairly calm. There are numerous camera covers ranging from a few dollars to close to one hundred.  
Some of the solutions are really quite complex, using special materials and elaborate systems to allow camera adjustments.  


Kata E-702
Kata produces some of the sturdiest camera bags on the market and their covers are certainly toward the higher end. The Kata E-702 has hand sleeves for internal adjustments and strategically located windows. It seems to have quite positive reviews, but with the extended lens sleeve, it will set you back over $120.  Since I only infrequently shoot in the rain, I have generally gone for cheaper approaches.  I have the Opt/Tech Rainsleeve which is quite basic and only costs about $7 for a package of two. The rain sleeve is simply a clear plastic tube that attaches to the front of the lens with a draw string and a small opening held to the viewfinder by your eye cup. The tube fits rather snuggly and when the camera is on a tripod, all adjustments must be done through the plastic. I like to get underneath the cover to have a better feel for the controls so I have never really felt comfortable with this approach. My recent solution has been decidedly low tech, but cheap and effective. On my rainy shoot last week I simply cut a kitchen garbage bag to protect the gear. My approach was to slice the bag along one of its sides to allow me to easily slip the bag over the camera. I then added a lens hole on the opposite side of the bottom of the bag. I used a rubber band to attach the  opening to the lens. I then had easy access to the controls from the  
back and from below, putting my head underneath only when it was time to frame and focus. It does help to know the feel of your controls since in my case the white bag was only vaguely translucent. This worked well although I still had to use my towels to wipe off stray droplets and there was no escaping the need to constantly watch for drops on the filter protecting my lens. I don't believe this would work as well in high gusty winds, but for most situations it is quite adequate and the bags are very easy to stuff into a corner of any bag.  Just one additional point is worth mentioning. You should use a clear or translucent bag. If nervous security personal can't see under your black plastic wrap they may assume you are aiming a grenade launcher at that precious national monument. In the end there are many effective ways to cover your gear, the important thing is to do SOMETHING.

A few more thoughts.
Now that you have dressed your camera for the weather, it is time to think of your own comfort. Water resistant, breathable rain gear is a must. Since I seldom bother with rainproof pants, I usually bring a couple of large trash bags to cover the ground where I am sitting or knelling. In a gentle rain my lens hood does a good job keeping drops off the lens filter especially if I can keep the camera pointing down most of the time. But when the rain is heavy and blowing, lens cloths can get saturated very quickly. It is wise to bring several cloths on a rainy shoot. Towels are also helpful to have on hand to continually wipe off your equipment and yourself. Finally when you come home after a shoot on a cold rainy day you would be smart to place your gear in a plastic bag to avoid condensation as it warms, but if the weather is already warm a bag will only hold in the moisture and slow the drying process.


Photography in the rain opens opportunities for dramatic images and with a little forethought and planning your camera won't end up paying the price in the shop.


Galapagos Tortoise, Ecuador

Sunday, August 21, 2011

"Paint-Out" in Peterborough


Our Town

The 6th Annual Sharon Arts Center Paint-Out was held last week which means that I spent the last week running back and forth to Peterborough NH, a 45 minute trip, looking for exciting locations to shoot. Every year the Arts Center sponsors this event to draw local artists to a specific locale. This year the location was the classic New England town of Peterborough, the original "Our Town" from Thornton Wilder's play. As in past years the center solicited local property owners to allow access to their land for one week and, at the end, the results were displayed at a Friday evening show. It is a great opportunity to discover a new area and to have access to some remarkably beautiful sites that would otherwise be out of reach. 


Noone Falls In the Rain


Rosaly's Garden
As might be expected this format makes for a hectic week.  I had to find time to get over to Peterborough (hopefully in good light), to capture the requisite number of spectacular images while leaving enough time to process, print and mat
them for the Friday evening show. This year
was particularly stressful. In my pre-scouting


Contoocook River
 the week before, I found some interesting possibilities, but most seemed to be "morning" sites. The way my work week laid out, I only had Monday morning, and of course, it poured rain all that day. No soft morning light. The good news was that I was able to catch the freshly engorged Noone Falls in soft overcast. The light also worked well on the flowers in the many beautiful gardens. The bad news was that, after a few hours, I was drenched to the skin. Fortunately the make-shift camera cover that I had fashioned from a kitchen garbage bag work well enough to keep my camera from drowning, but I did saturate two large towels from continuously drying off the equipment. The weather was substantially better for the rest of the week, but since I had to work Tuesday through Thursday all I could do was try to get back over to Peterborough for the evening light. The thrill of this kind of short schedule shooting is that it adds an extra sense of adventure to your explorations, but it was a bit exhausting. I was up until 2am Friday morning finishing the final eight images.


The Friday evening reception and show was held at the beautiful Sharon Arts Center Gallery in downtown Peterborough. It waswell attended, and perhaps most importantly, the food


The photographer gets the spot
next to the bar
and wine were excellent - and free! As the only photographer participating in the "Paint-Out", I was somewhat the odd man out, but, since I have been unable to convince the Center to change the name to "Paint and Pixel - Out", I had to just struggle along. One major consolation was that I was given the spot right next to the bar.  I was disappointed this year that there wasn't at least one other photographer to commiserate with. I guess if I was a real artist I would paint. (note: please excuse snarky comment)


Nubanusit Brook
As in past years, the real attraction of the Paint-Out was all about the refreshing photographic opportunities. In the end I found some lovely spots and probably missed many more. I gained a new appreciation of the photographic attractions in an area in which I was relatively unfamiliar and that will undoubtedly lead to more return visits. Most importantly, I met many lovely people who welcomed me to there properties. That is really what a "Pixel-Out" should be all about.

Check out more information about the Sharon Arts Center's many events and classes at: http://www.sharonarts.org/

I will be adding more images from this year's Paint-Out on my flickr Set

Sunday, August 14, 2011

HDR: Bon Appetitt


"Going Crazy" at Cathedral of the Pines
I have always had a love-hate relationship with High Dynamic Range Photography. I view the ability to capture a broad span of brightness in a way that more closely matches the capability of the human eye as one of the many remarkable advantages of the digital recording of images. Although Digital sensors are constantly improving, they remain inferior to film (especially negative film) in terms of the range of brightness that can be recorded, but digital images are receptive to a array of post processing techniques that can broaden their dynamic range to a remarkable degree. High contrast subjects that, with film, would require a decision to either expose for the highlights or the shadows can be captured with the full range of brightness. There are a growing number of powerful HDR programs that can combine several bracketed exposures to generate a high dynamic range image. Photomatix has been the standard for some time, but others are in the competition. Photoshop has included an HDR function in recent versions, but, for me, this solution remains inferior to other options.


Mt. Monadnock from Catherdral of the Pines : Going crazy again!
These programs perform real magic to an image, but to my taste (and it is certainly a matter of taste) HDR too often is taken miles beyond the rescue of lost contrast and into a cartoonish rendering of reality that may be seen as artistic but in no way reflects how the subject was seen. Before I hear the howls of indignant protest, let me acknowledge that HDR is like seasoning on food, some like a touch and others prefer to pour it on. There are incredible artists out there who create remarkable images with HDR, check out Trey Radcliff's anazing work. Everyone's taste is valid, this is only about my sensibility and capabilities.


I was reminded about all this a couple of weeks ago when I received a inquiry from a designer who was interested in using one of my images on a "gourmet" doggy treat package. I have FINALLY arrived! I was surprised when I learned that the picture he had selected was one of just a few on which I had experimented with what I feel is rather garishly heavy HDR rendering. The picture was a multi-image capture of a farm connected to the beautiful and inspiring Cathedral of the Pines in Rindge New Hampshire. It was fun to "go crazy" with this, but It is not the way I normally choose to reflect what I see and, as a result, I was unprepared to have it attract this attention. I'm not sure whether I will actually make it to the doggy bag, but, my sensibilities aside, I will certainly be happy to license the image.


HDR simply refers to a variety of techniques which are are available to capture the full range of brightness and I feel that this is sometimes better accomplished with manipulations in Photoshop that don't involve bracketed images or dedicated software.  There are situation in which I am quite happy to use HDR software such as Photomatrix.  Last week, while scouting sites in Peterborough NH for the upcoming Sharon Arts "Paint-Out", I came a cross a nice field of new mowed hay glowing in the evening light.  The contrast between sun and shadow was daunting, but three images in Photomatrix did a impressive job balancing the light.  Because the images were taken in a burst there was essentially no movement in the trees or clouds to cause ghosting. All I had to do was blend out a bit of banding in the clouds.  In the right situation HDR software can be magical and so, when faced with a high contrast subject, I will often take a series of exposures with the thought that I may go into Photomatrix to gently massage out the full dynamic range. The results are usually striking at first glance, but on closer inspection I often start seeing problems that become significant if the images is to be taken beyond a small on-line picture. Coarse grain, ghosting of moving elements, chromatic aberration and loss of sharpness become particularly troublesome when I try to print large images for display or sale. I frequently end up returning to Photoshop to either manually blend a couple of the images or use the software's powerful tools to tame the broad contrast. This inevitably takes considerably more time, but in the end I am usually much happier with the results. 


Ok her is an example. Two nights ago, while walking Nelly to the l


Tone Mapped PhotoMatix
Image
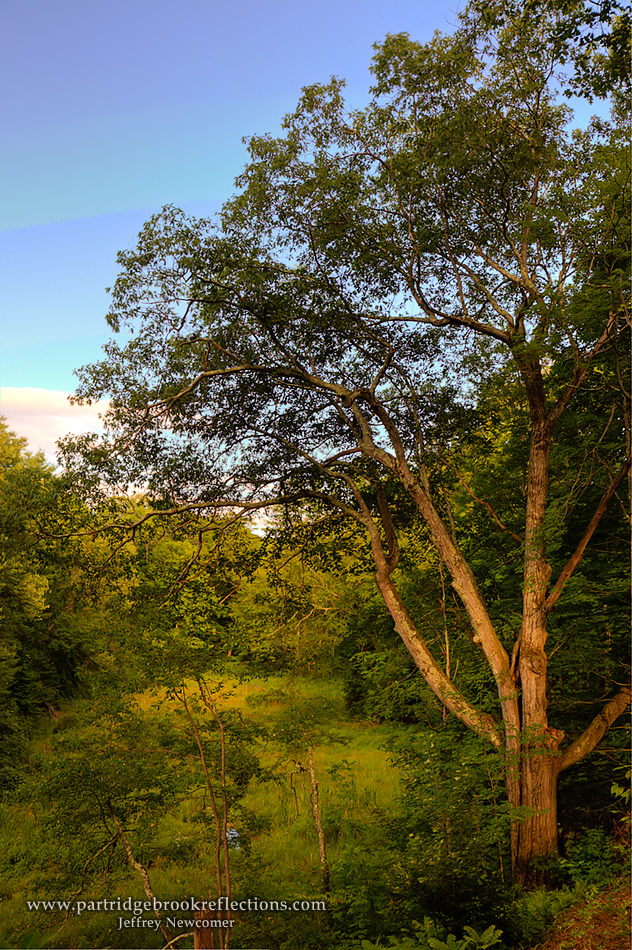
ake for a swim, I found the golden evening light highlighting a great old oak at the edge of Partridge Brook. For a long time I have been looking for the opportunity to capture this tree when it would stand out against the background jumble of marsh and trees. This was it. The contrast was too much for my taste so I took three bracketed images, and returned home to get to work. After a bit of preliminary work in Adobe Raw, I plugged the images into Photomatrix and, after experimenting with the program's dizzying number of adjustments, I came up with what I felt was a striking image.
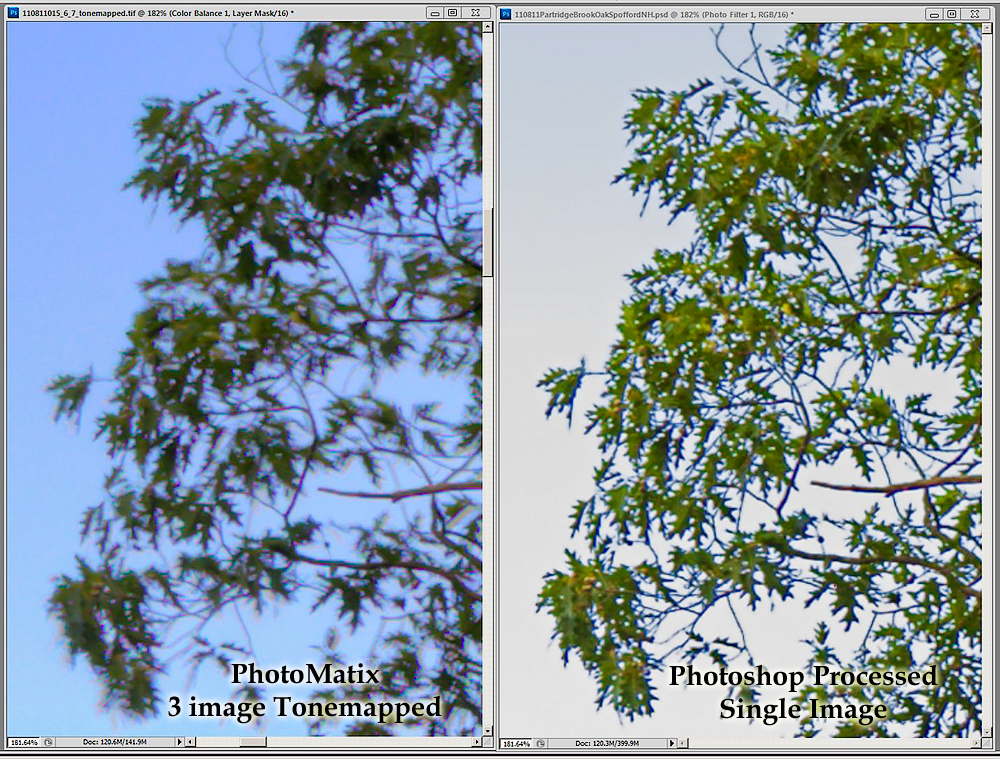
On closer inspection however I found the usual problems. Even with light wind, the leaves were blurred and ghosted. The sky showed color banding and the image was generally quite soft and grainy. I went back to Photoshop. I chose the one image whose 
histogram showed the best range of contrast and then went back to work.  As can be seen from the layers, this was not the simplest approach. I first used the magic Shadow/Highlight tool to narrow the contrast. I used Color Range to select the sky for separate


Photoshop Image
adjustment. This required work to keep the sky selection from bleeding over into the leaves, but Photoshop's new selection tools make this complicated task a relative stroll in the park. Although I was not able to get the same deep blue seen in the tonemapped version without becoming subject to the same banding artifacts, I think the broader range in intensity is more natural. With the precise sky selection in hand, I was able to invert it to make isolated adjustment in the warm tones of the foliage.


At the end, I think I came out with a result that was every bit as effective a the tonemapped version and, as can be seen in the close-up comparison, much sharper and clean. I am sure that HDR software will continue to rapidly improve. Already there are in-camera HDR solutions which I expect will become standard in the near future. For now I think its great that we have so many choices. I will continue to use whichever tool gives me the best control over dynamic range and I am sure others will continue use these tools to create there own images to satisfy the broadest range of photographic tastes. Bon appetitt!


Sunday, August 7, 2011

Isles of Shoals


Sunrise on Rye Beach
Last weekend Sue and I took our annual summer trip to Rye Beach New Hampshire.  For years, good friends of ours have rented a cottage on the beach, and we typically plan one weekend every summer to visit.  It is our annual dose of beach sitting.  Two days of lounging by the shore, rolling my toes in the sand and watching the full range of body types walking by is about all I can take.  Fortunately it is also a great chance to shoot the seacoast, one of my favorite activities. The weather was perfect, sunny and warm – that is to say, less than perfect for dramatic ocean images, but there were some special opportunities.


On Saturday we rode a converted lobster boat 6 miles out into the 


Oceanic Hotel, Star Island
gulf of Maine for a brief visit to the Isles of Shoals. The Isles of Shoals is a starkly beautiful collection of dry rocky islands which straddle the border between Maine and New Hampshire. We cruised around the major islands of the group and had the opportunity to briefly explore Star Island. Over the centuries the islands have been used as a fishing base for native Americans and early settlers, and more recently as an isolated summer retreat. The islands vary from small tidal ledges to Appledore Island, which at 95 acres is the largest of the group.


 The second largest island, and the only one with public ferry service, is 45 acre Star Island. This island is used as a religious conference center affiliated with the United Church of Christ and the Unitarian Universalist Association. During the summer the organization sponsors conferences covering a broad range of religious and secular topics.  In addition to the formal conferences, visitors can come for a “personal retreat” staying for one night or a few days.  Day visitors are also welcome to explore the rocky landscape and its well preserved historic buildings.  The conferences are held in the old Oceanic Hotel and Gosport House, which are the remaining examples of the Isles of Shoal’s “Grand” hotels that were popular during its peak as a summer retreat. There are also many surviving old stone structures dating back to the original settlement. The most striking of these is the classic 150 year old Chapel which proudly overlooks the surrounding islands from its perch on the modest height of land.


The Ferry from Portsmouth is in.


White Island Light
from Star Island
Despite its diminutive size Star Island provides a treasure of photographic opportunities. The windswept landscape is tough on living things, but there are interesting hardy trees and shrubs as well as an array of wildflowers.  There is also a variety of sea birds in residence and seals can occassionally be spotted patroling the surrounding waters.  The old buildings provide a wonderful glimpse back into hisory from early colonial times to faded 19th century opulence.  It is all set against vistas of the enveloping ocean, punctuated by the rugged surrounding islands, many of which have evocative names such as Appledore, Mingo, and Smuttynose.  It is hard to imagine a more classically situated, small 


White Island Lighthouse
island lighthouse than the White Island Light, lying just to the south of Star Island.  The lighthouse appears as if it had grown directly out of its small strip of rocky ledge.  Sadly I only had about 90 minutes to explore the island this weekend and I was stuck dealing with the brilliant midday light, but I am seriously considering reserving my own “personal retreat” in the near future. What a gift to have this magical place for a sunset and sunrise, or perhaps several.


For more information :Star Island Corporation


For more images check out my Atlantic Coast Flickr Set